You may have heard of the noise-canceling feature in AirPods that Apple so proudly boasts about, but didn’t you experience it while wearing the pair?
This may be because the noise canceling feature is not enabled on your pair of AirPods Pro. But this is not something to worry about as the noise canceling feature can be activated with any Apple device, from iPhone, iPad and even Apple Watch.
Steps to activate AirPods noise cancellation using iPhone or iPad
Here are two ways you can enable noise cancellation on your AirPods using your iPhone or iPad.
Before doing the process below, first, make sure that your AirPods are connected to your iPhone and there is no AirPods connection error. Once this is done, follow the steps below:
- First, swipe down from the top of your iPhone or iPad screen to open Control Center. This is where the options to enable or disable mobile data, Bluetooth, Wi-Fi, etc. are present.
- Now in the Control Center panel, long press on the volume slider icon to expand it.


- On the next screen, tap on the Noise Control option, present below the volume slider.

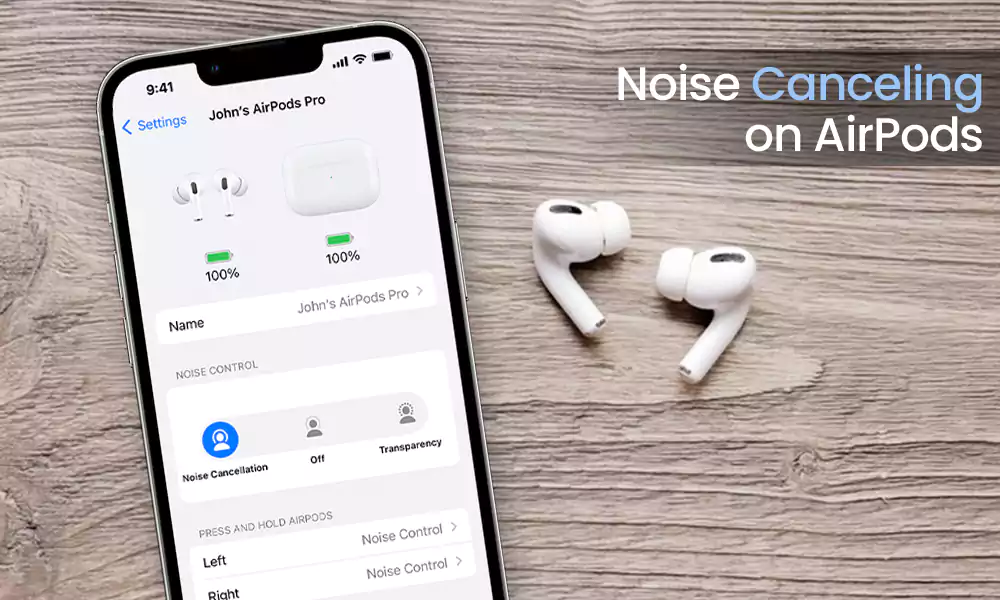
- Thereafter, three options will appear on your screen: Noise Cancellation, Off, and Transparency. There, tap on the Noise Cancellation option to enable noise cancellation for your AirPods Pro.

- To get started, open the Settings app.
- Within Settings, tap on the Bluetooth section.

- On the next page, where all your Bluetooth connected devices are listed, tap the information icon (i) next to your AirPods.
- Next, you’ll see some configuration options for your AirPods on the next screen. There, tap on the Noise Cancellation option. Once this is done, the noise cancellation of the AirPods will be enabled.

Activate noise cancellation on Airpods using Mac
Well. Above were the steps to activate Noise Cancellation when used with iPhone or iPad. But what about when you have paired your AirPods with Mac? How to activate noise cancellation on AirPods in that case?
Well, you don’t have to worry about that either. Because noted down there are two ways you can make your AirPods noise cancelling. So, check out these without further delay:
- First, you need to know how to pair your AirPods with your Mac and connect them.
- After the AirPods are connected to your Mac, click the volume control icon (AirPods icon) present on the top menu bar of your Mac screen.
- Next, from the menu that opens, click on the AirPods for which you want to activate noise cancellation.
- Later, several options will appear. There, select the Noise Cancellation option and your AirPod Pros noise cancellation will be enabled.

- First, click on the Apple Menu icon in the upper left corner of your screen.
- Select the System Settings option from the menu that opens.

- The Settings window will then open. There you have to go to the Bluetooth tab from the left sidebar.
- After that, click on the information icon (i) present next to the AirPods on which you want to activate noise canceling AirPods.
- Next, a small window will appear on your screen, where you need to click on the AirPods Pro Settings button.

- Next, click on the Noise Control section and from the menu, select the Noise Cancellation option. Once this is done, the noise cancellation of your AirPod Pro will be activated.

Activating AirPods noise cancellation with Apple Watch
Yes, not only can you use iPhone, iPad or Mac to activate noise cancellation on AirPods, but also Apple Watch can do the trick for you. Activating noise cancellation is quite easy using the watch when listening to any media on it.
So, to know how to get AirPods to cancel noise using Apple Watch, follow the process below:
- Connect your AirPods to your Apple Watch.
- Start listening to some audio on the watch. When you are listening to something, touch the AirPlay icon displayed on the media control screen.
- After that, the Noise Control options will appear on your watch screen. There, tap on the Noise Cancellation option, and now you can use your AirPods with noise cancellation.

Activate noise cancellation from the AirPods themselves
Although you can use your iPhone, iPad, Mac, or even Apple Watch to activate noise cancellation, doing so can be daunting, especially if you’re moving around or have your hands full.
This allows you to activate noise canceling mode with a simple tap on your AirPods without picking up any other device.
In such a scenario, the touch force sensors on your AirPods come in handy. The double-tap motion that pauses or resumes music may look familiar to you. But you may not know how to turn on noise cancellation on AirPods Pro with Force Sensor.
Don’t worry if you don’t know how to do it, because you’re about to find out how to do it by following this simple two-step process:
- On your AirPods Pro, touch the groove along the stem.
- Now, press and hold the slot that is also the force sensor. When you hear a high pitched voice, this indicates that the noise canceling feature is now active. However, if Transparency mode is on, repeat the process.
You must be thinking, what about the AirPods Max? Well, you can activate Noise Cancellation on them in the same way. Just press the Noise Control button. See image below.


Note: Your AirPods can be switched between three settings with this unique touch gesture: Noise Cancellation, Off, and Transparency. Repeat the touch gesture until the noise cancellation mode is activated.
How to turn off AirPods noise cancellation?
Now that you know how to use noise cancellation on AirPods Pro, you may be wondering how to turn it off.
Activating noise cancellation on AirPods follows the same process as enabling it. The difference is that you must select the option “disabled” rather “Noise Cancellation”. Here’s how you can do this using different devices and the AirPods themselves:
- First, make sure your AirPods are connected to your iPhone or iPad.
- Then, open the Settings app on your device and tap on the Bluetooth section.

- On the next page, tap on the information icon present next to the AirPods.
- Finally, low noise control On the next page, tap the Disable option and your AirPods Pro will turn noise cancellation off.

- Start by making sure your AirPods are connected to your Mac.
- Click the Apple menu icon at the top of your Mac screen and select the System Settings option.

- Then click the information icon (i) next to your AirPods name under my devices.
- Finally, click on the Noise Control section and click Disable. With that, your AirPd Pro turns noise cancellation off.

AirPods Max: If you’re using Airpods Max, press and hold the noise control button until you hear a high-pitched sound indicating mode change. In case you have enabled Transparency mode, press and hold the noise control button again until you hear the sound.
How to customize the touch settings of your AirPods?
Now you know that by holding down the force sensor or noise control button on the AirPods, you can switch between active noise cancellation and transparency mode. In the Bluetooth settings on your iPhone, iPad, or Mac, you can choose which of three modes — Transparency mode, Active Noise Cancellation, and Off — to toggle on.
Here’s how you can customize these options on your AirPod on iPhone or iPad:
- Pair your AirPods with your iPhone or iPad.
- Go to your device settings and tap on the Bluetooth section.

- Then, tap on the information icon (i) next to your AirPods.
- On the next screen, tap to the left or right below the Press and hold AirPods section.

- Next, make sure Noise Control is selected.

- Finally, choose two or three noise control modes that you want to access when you long-press your AirPods.

What are the noise control modes on AirPods?
If you don’t already know, let me clarify that there are two modes of noise control on the AirPods: active noise cancellation and transparency. If you want to know what they are and how they work, read between the lines below:
Active noise cancellation uses an external microphone or microphones to identify external noises. Your AirPods Pro or AirPods Max then use anti-noise to filter out external sounds before you even hear them. AirPods also have anti-noise to block out any unwanted internal sounds that are picked up by an inward-facing microphone.
However, Transparency mode is just the opposite of Noise Cancellation mode. It lets you hear what’s going on around you by letting outside sound into your ears so you’re not completely cut off from the outside world.
There is also a third Noise Control option, Off, which is only used to turn off either of the two enabled modes.
Well. That’s all folks! I hope the above article was helpful and now you know how to cancel noise from AirPods using different devices and the AirPods themselves!
Sources:
Read more:
Categories: Technology
Source: SCHOOL TRANG DAI